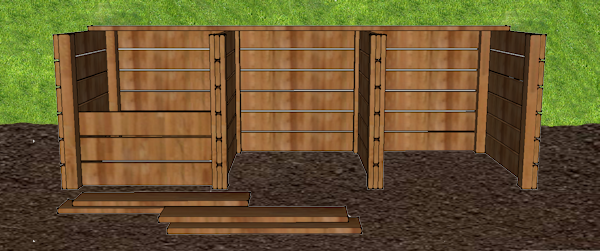
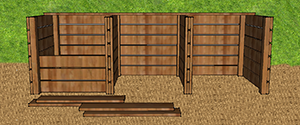
Do you dream of having the ultimate compost bin? If you do it probably looks much like this one. Three unit bins have been envied by composters the world over as the ideal. If it is what you dream of and want to build, here is your detailed guide to building the best one you will find anywhere.
Why Is This The Ultimate Composter?
There are many good reasons to build a compost unit like this one and additional reasons for taking advantages of the specifics of this plan. In laying out the details of this design I studied the plans of others but made specific improvements structurally.
I believe this is the ultimate compost bin!
This type of compost bin meets all the requirements for a truly effective compost bin.
- First, and most important, each section is four foot square, the minimum size required to enable compost to decompose at an optimal level.
- It is reasonably easy to turn by shoveling from one section to the next, turning over twice from one end to the other.
- The front has removable panels to make access for turning or for using compost easy.
- The design makes it an attractive addition to the garden.
But what makes this particular design better than most if not all others? There are several reasons.
Because I happen to have a formal education in construction methods I easily recognized weaknesses in most plans and altered the materials and construction details in this one so they are stronger and more likely to hold up over time.
In particular, I have a somewhat different arrangement at the front of the center panels than I have seen elsewhere, one which will work much better when removing and replacing the front panels.
This front area will receive the most use. It needs to be substantial enough to hold up and designed to make it easy for the user to insert the front boards. I will show these details later in the article along with the full design of the compost bin.
How to Build Your Ultimate Compost Bin
As with any building project, there are certain basic steps to follow:
- Review the plans carefully and have a good idea of the overall work you will be doing.
- Decide on the correct order of steps you plan to follow in building your project including the location in which you will work.
- Buy or round up all the materials needed (remember that your cutoff saw needs to be able to cut a 2X8).
- Gather all the tools you will need (a few extra hands will likely be needed at the final assembly stage to complete the job).
The list of materials needed for your ultimate compost bin is really short. The most challenging decision is that of the type of wood to use. If you want you can use treated lumber but especially for vegetable gardens many people hesitate to use it. Cedar is no doubt the deluxe choice for durability but is quite expensive. You need to avoid pine or any really soft lumber or it will not last as long. Personally I like the idea of Douglas Fir as a reasonable compromise.
Materials List:
- 2-4X4X8 lumber For Corner Posts
- 20-2X8X12 lumber For Back and Front, End, and Divider Panels (or equivalent 8 foot lumber for ease of handling except for 6 twelve foot boards for back)
- 4-2X4X8 lumber for Divider Panel Posts
- 1-2X4X8 lumber for Front Panel Guides (or equivalent alternative—see description)
- 3-2X4X8 lumber for Top Alignment Brace (angled)
- or 1-2X4X12 (straight), for Top Alignment Brace (straight)
- or 4-24 inch pieces of sign post for Front Alignment Braces
- Large Box of 2 3/4 inch external screws
- Small Box of 2 inch external screws
Tool List:
- Cutoff Saw (capable of cutting a 2X8)
- Framing Square
- Driver-Drill
- Tape Measure
- Pencil (or marking knife)
- Other (a few other tools may be needed if you choose some options)
Construction Process
Once you have your materials and tools together, construction of the ultimate compost bin is straight forward. There are a couple of options that will depend on your personal choice or cutting tools available. I will mention those at the relevant time.
I recommend dividing the work into four parts. First construct the ends, next the divider panels, then attach the the back, and finally take care of some finishing touches. Find a flat area such as a garage floor to build the ends and dividers but plan to attach the back in place. Even if you work alone on other parts you really need at least one other person to help while attaching the back.
Building the End Panels
The end panels are very simple to build. Separate two 4 foot 4X4’s so you can attach a four foot 2X8 as shown to each end. It is very important to use your square to make sure the board and post(s) are square to each other. It is also important to work from the top to the bottom (note that the legs are slightly longer than the six panels). Use at least three 2 3/4 inch exterior screws at the end of each board.
Be sure to leave 3/4" between boards to give air space for your compost. The best way to do this is to use a 3/4" spacer (a strip of 3/4" wood) placed between panel boards while attaching them.
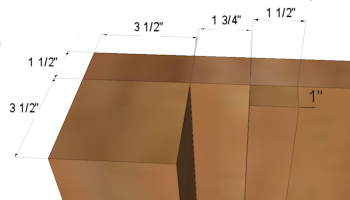
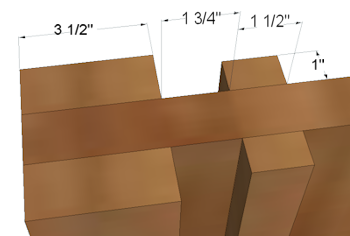
It is easy to think this is a project that does not need to be precise, but if you want your front panels to be easy to insert and remove you do need to be careful in lining up your parts so they are straight and properly spaced. I suggest making the track 1 3/4 inch wide so your 1 1/2 inch 2X8 front panels will fit easily.
My recommendation for the front channel guides requires access to a table saw but you can easily substitute a similar size board. To get the 1 1/2 X 1 inch board I would take a four foot 2X4 and cut off three one inch strips on the table saw.
Doing this twice will provide the six total pieces you need. One inch lumber you buy is actually only three-fourths of an inch, as you know, and should be fine, but I prefer this method to get the extra depth for the groove.
Ultimate Tip Plus*
New option: here is an idea that will make your ultimate compost bin even better. It is a very small adjustment but it will make it easier to insert the front planks into your bin as you add new ones.
Instead of coming all the way to the top, when you make your guide behind the front panels (toward the front of your end and divider panels) cut it a little short, just an inch or two. That way, when you insert your boards you can press them against the front posts, straighten upright and then slide them right into the slot rather than having to get both front and back of the board aligned to the slot first.
*Plus tips are new ideas or suggestions for improvements to the ultimate compost bin that are not shown in the illustrations or discussed elsewhere but are worth considering.
Building the Divider Panels
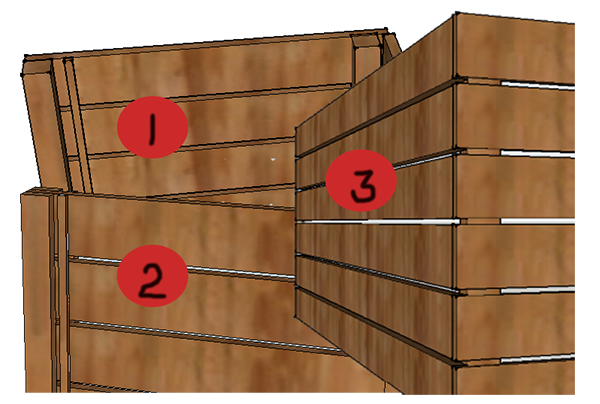
The divider panels adopt a front end design of my own that is somewhat different than I have seen elsewhere, one that seems to be an obvious improvement to me. Instead of using another 4X4 on one side of the side panels (as on the end panels) and contriving some sort of front panel board support on the other side, I chose to use two 2X4’s, putting one on each side of the horizontal divider boards in order to provide the strong front support needed to hold the compost behind the front panels.
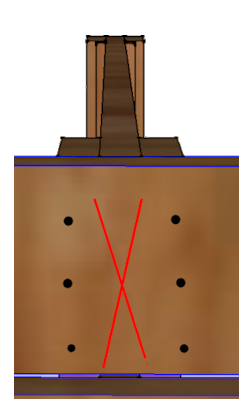
The arrangement is clear in the diagrams above and to the right. The key things to keep in mind are essentially the same as with the end panels.
- Always work from the top to the bottom.
- Use a square to make sure the boards are at right angles.
- Put three screws into each 2X8 board.
- Use a 3/4" spacer while attaching the 2X8 panel boards.
- Use care in aligning the vertical guide strip making the channel for the front panel boards in order to assure a smooth path.
A couple of brief tips. If you have a table saw or some method of making a 1 3/4" spacer to help align the guide strips it is very helpful. If not you can just measure at each end but a spacer will make it easier. Also, screw from the 2X4 into each 2X8 at the beginning, not the other way around, so that when you connect the second side you will not risk hitting the head of a screw.
Attaching the Back to Your Compost Bin
Assembling the compost bin into its final form looks simple, but it is a little challenging without some thoughtful preparation in at least two areas. First, it is not easy to do without some help so you will want to line up some extra hands ahead of time. And second, for your front panels to work as you want it is essential to get the dividers located properly.
As far as the help is concerned, almost anyone can do the job and it will not be hard, but you need someone to hold the end panels upright while you attach at least the first 12 foot 2X8 and you should have some help holding one end of each 2X8 while you attach the other end.
Choose your location carefully. This is a sizeable unit and not easy to move. Also, make sure you have level ground on which to assemble the bin. Use a shovel or rake to help level and smooth the ground.
Do not hurry at this point. Take time to make sure everything is level and square. Use your framing square and perhaps a level. It will not take long to get it right and it will help assure that inserting or removing the front panels will be smooth and easy.
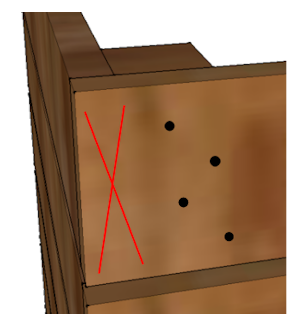
With the end panels supported or held upright start at the top and work your way down. Attach with one screw on each end and get the bin squared before putting in additional screws, four through each 2X8 end into the 4X4 post. Again, use a 3/4" spacer while starting each board.
And one more thing. Attach the back boards to the 4X4’s, not the end panels. Screwing into the the side boards (because it is the end grain) will not hold as firmly as entering the sides of the 4X4 posts. Note the red “X” on the illustrations showing this.
Attaching the Divider Panels to Your Compost Bin
Follow a similar process in attaching the two divider sections. Locate accurately. Use your shovel or rake to level and smooth the ground. Attach with two or three 2 3/4" screws into each side of the divider, entering a 2X4 in each case, not the ends of the panel boards.
Keep in mind that it is essential to precisely locate the dividers so that the front boards will fit equally in all three sections. Don’t assume any measurements. It is best to wait until this point. Then measure.
Do not measure from the very end of the compost bin. Instead measure from the middle of the 2X8 panel boards on each end and divide by three (it should be a little under four feet). Then measure off and mark this distance (again measuring from the center of the 2X8 end panels) on the top of the back panels. Use this mark to locate the center of the divider panel 2X8 boards.
Final Touches
There are two more steps to completing your ultimate compost bin. Both are relatively simple.
First, it is essential to provide adequate bracing to keep the alignment in place so the spacing between sections will remain stable and the front panels will fit as they should.
There are several ways to do this so I will mention a couple of simple ways you might choose before suggesting my preferred method. It is a little more complicated, but easy enough to be worth the effort in my view.
One easy way is to use one 12 foot 2X4 along the top of the bin between 18" and 24"s from the back. Attach firmly to each end and divider. This will keep the panels in alignment. This is the method pictured if you look carefully in the top image.
Another method is to use a length of sign post, perhaps 24" long, in front of each end and divider section. Drive them at least 6"s into the ground and screw securely into the posts. This will also do the job.
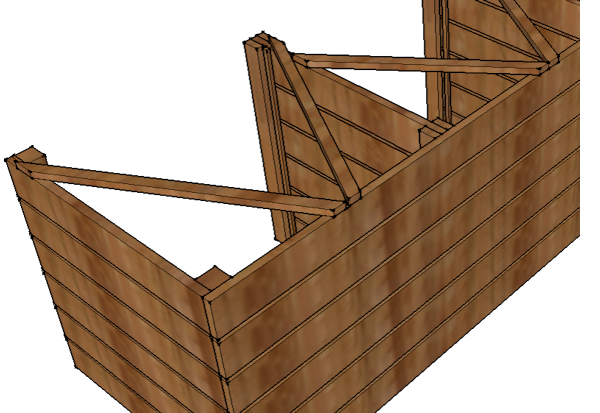
My top recommendation, however, is to take time to make diagonal braces for each section. Use 2X4 material. You will need to make an angled cut on the end of each brace. The idea is to run from the center of the back in each section with two pieces running out to each side near the front, either to an end or divider panel.
Do not worry about measuring to length (precise lengths are unnecessary as long as the triangular bracing is done for ultimate stability. The larger the triangles the better. Be careful, however, not to block the top of the slot for your front panel boards!
Just lay a 2X4 over the top panel you want to secure it and mark the cuts with a pencil on each end. Start with the end sections and make the braces as long as possible. Then make braces for the center section as long as they will fit just short of the outside braces on top of the divider panels.
This method for the securing alignment has three strengths.
- First, the triangulation is more stable than any other method.
- Second, it supports at the top which numerous plans lack, by stabilizing only at the bottom.
- And third, it does this while still allowing easy entrance into the center area of each section for shoveling or even operating a small tiller.
Second, finish the front panel boards. Measure and cut to the exact length you need (all three sections should be the same if the previous instructions were followed carefully). You may want to attach some short (2-3 inch) strips of spacer material to each end of the bottom of each of the panel boards so there will be the usual 3/4" spacing between boards for air.
Enjoy Your Ultimate Compost Bin
This is a great compost bin, and if you build and use one I am sure you will enjoy it. If you do and you ever find anything that makes it less than the “ultimate,” or otherwise have an idea of how it could be better, please let me know. I will upgrade the design right away! But for now, I believe this is the ultimate compost bin.
Good success with your gardening.
